Rye Bread (Ražný Chlieb)
Ingredients: (these are just estimates) 3 cups all-purpose flour, 2 cups rye flour, teaspoon of caraway seeds, teaspoon of basil leaves, plenty of salt, sugar, milk, oil
Prep time: about 30 minutes to get the dough ready, some hour or two to let it rise, another hour for baking
Is there anything more delicious than freshly baked bread, still warm to melt the butter, sprinkled with bit of salt?
I don’t think so. And the Slavs of the past shared this view, since bread and salt (chlieb a soľ) became the universal gift offered to visitors through out all Slavic lands. Bread symbolizes life, while salt stands for health (from a Slovak blog). One really famous Slovak fairy tales even tells a story of a king who destroyed all salt in his kingdom, and salt became more precious than gold. Bread and salt, two simple staples, yet so full of meaning, are offered to all foreign dignitaries visiting the land.
Bread can be made of variety of flour. The most common is white or all-purpose flour consisting of milled wheat (pšenica). But many other cereals besides wheat are used in making of bread. These include barley (jačmeň) and my favorite grain, rye (raž). I was very happy to find a bag of rye flour (ražná múka) in my local Giant (grocery chain). Then, when I found myself without bread about a week later, I figured I’ll give it a shot. I combined the flour, yeast, worked the dough and … disaster! I realized, post-fact, that rye bread is actually not made primarily of rye flour. The resulting bread was extremely dense. It felt like a brick. But, it actually tasted quite good (and healthy) and kept for a while. It never became hard, I finally had to dispose of it when it started getting moldy.
Few days later I decided to try again. This time I used about equal amounts of rye and white flour. Not knowing how the bread will turn out (this was just my second time ever baking bread, not counting the one time I helped my grandma), I decided against taking photos. Too bad, because it was great! The loaf was gone in about a day, and hence came another opportunity to bake more bread. Here are the steps again. This bread was prepared without any specific recipe, I instead just followed my grandma’s lesson and added spices I like, such as caraway seeds, basil and olive oil.

Here is what you will need. I used just a half packet of yeast. I wanted to save some money, since each packet costs about a buck – and I was making just one loaf.
Prepare the yeast culture


Add the yeast (kvások) to lukewarm milk (mlieko) and also add some two spoons of sugar (cukor). Whisk well to give the yeast plenty of air (vzduch).
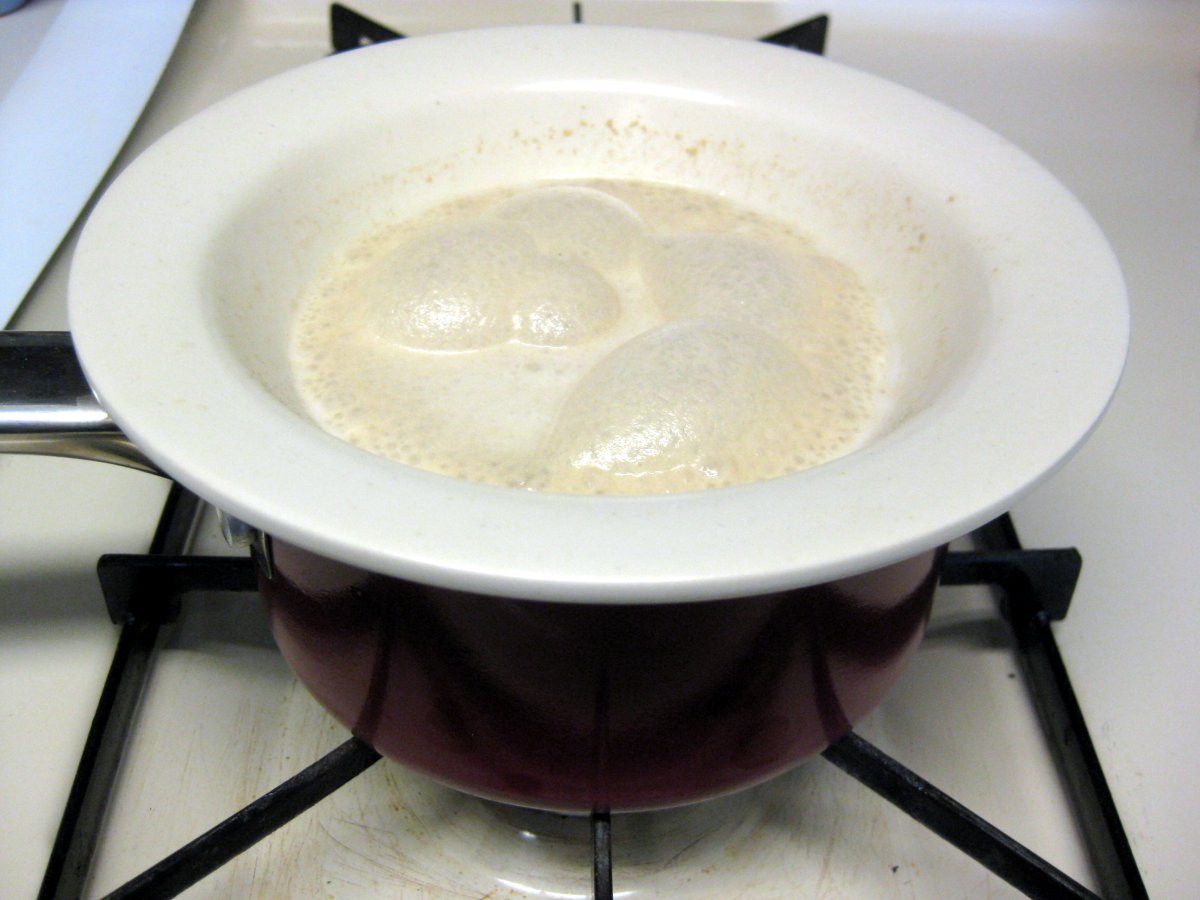
So what if the yeast is slow to rise? You can give it a little nudge by placing the bowl over a pot containing hot water. Just make sure to turn the heat off so you don’t end up accidentally cooking the little critters.
Mix the ingredients


In the meantime, in a large bowl combine about equal amounts of rye and all-purpose flour. I was making just a single loaf so I used about two cups each – but this is just an estimate. I made everything “by eye”. Add in some caraway seeds (rasca) and basil (bazalka, or any other spices you like, rosemary would probably work great). I added about a teaspoon each, but again this was done by eye only. Finally, add plenty of salt (soľ). Pour in the yeast mixture. Use your hands to mix everything together.

You will most likely end up with individual flour globules, since there won’t be enough liquid. Add bit of lukewarm water (voda), and mix in until you get a single solid block. You may be amazed by just how little water is actually needed. This is where I started kneading the dough. But, the consistency will very likely still be quite granular, so add bit more water…


… or slightly more than a bit. I had a little accident as I overestimated the amount needed. My nice block turned into mud! Disaster? No, not at all. If this happens, simply keep mixing the “mud” until most of the water is absorbed. It’s quite amazing just how much water flour can take in. Still, in the end, my dough was still too gooey so I added more all-purpose flour. Again, form everything into a single block and continue kneading. Here I found it helpful to line the sides of the bowl with flour. This way the dough picked up more flour as it needed. It also keeps the dough from sticking.
Knead the dough


The purpose of kneading the bread is two fold. First, kneading assures that all the ingredients are evenly distributed. Secondly, this mechanical process helps unfold the protein chains contained in the flour, called gluten. These proteins give the dough the stiffness and the elasticity needed to prevent it from collapsing during rising. To knead bread, take the back of your wrist and push out. Then fold the dough over, turn 90o, and repeat.
Or just watch the video… Do this until you get tired of it, but at least for 10 minutes. You will see the dough become elastic and you should start seeing it rise. You will notice little puffed up air pockets under your wrist.
Prove, form and bake


Once you are happy with it (or tired of kneading), form the dough into a ball. Dust the sides of your bowl with flour. Also sprinkle some flour on the dough ball. Cover, to keep draft away, and let rise for an hour or two (I let it sit for almost 2 hours). Yeast likes it warm. You can help it by placing the dough on top of a pot of hot water, similar to what was done to get the yeast culture going. Again, make sure the stove is not on.
I waited until the dough felt quite puffy. Note, since rye flour is rather dense, this dough will not rise as much as one consisting of only white flour.


Scoop out the dough onto a flour-dusted board. Here I kneaded the dough few more times to make sure that no large air pockets lurked inside. I then started forming it into a loaf by grabbing it on both sides and turning over. I couldn’t completely capture this as I needed one hand to operate the camera, but you can still see the indentation left by my right hand. What you are trying to do here is to work out any non-uniformities and work the dough into a single unit with no non-sticky flour folds in it. These folds tend to open up during baking – as also happened in my case. But it’s not really a big deal. A trick I learned after the fact is to stretch the dough out and fold it over like an envelope. You then form it into the loaf and bake it the folded side down. Place the loaf into a baking pan. Brush on some oil (olej, I used olive oil) and sprinkle on little flour to give the bread the rustic look.

Let rest for about 15 minutes. This is important as it gives the bread a chance to regain some of the puffiness lost during shaping. Use this time to preheat the oven to 375F. Bake on the bottom rack, otherwise the bottom crust will be too soft. Bake for about an hour, until the crust looks crunchy. Do not open the stove until the crust sets. You can test if the bread is done by testing if it sounds hollow when you tap on it – it should. Finally, turn the oven off and let the bread cool on the wire rack. If you want, you can brush on water on the baked crust to soften it. I didn’t do this as I like my bread crunchy. Wait for the bread to cool before cutting. This will take a while, maybe even an hour.
And enjoy freshly home-baked bread…


And that’s it. It’s actually quite easy to bake your own bread. It turned out great, although my previous attempt (picture on the right) had a little nicer look to it, I think. I coated the bread with slightly too much flour, plus the crust cracked more than I would have liked. Still, the taste was amazing. Enjoy!
Do you have any bread-baking tips or secrets you would like to share?
Hi Lubos,
Thank you very much for this recipe. I can already imagine my kitchen smelling absolutely gorgeous when I’m baking it :))
Can soy milk be substituted for regular milk?
Hi, I did bit of internet search and it appears that it doesn’t really matter what you dissolve the yeast in, as long as the liquid is warm. My grandma uses water with little bit of milk mixed in. I used just milk. But I think you can get away with using only warm water. What’s important is to give the yeast something to eat. Yeast is a microorganism which converts sugars into alcohol and carbon dioxide. The latter gives bread the puffiness. Once the yeast is in the flour, it will obtain the carbohydrates from the flour itself. But by giving it the initial sugar bath, you make sure the yeast is active and will not waste your time waiting for the dough to rise containing dead yeast.
I bake a lot of bread and use only water. So i don’t think it will be a problem to use soy milk.
Also popular is sourdough bread.
It takes days to make, but an alternative is to use dried sourdough. It tasted nearly just as good and takes a lot less time.
Hi, I use potatoe water(cook 1 potatoe and add about 2 cups or more water) When you start mixing the yeast into the warm water, add 1 cup of flour and mix well… Cover your bowl with a towel,for about 20 minutes till it get foamy, then add the rest of the flour and other ingredients.Let dough raise. Letting the water,yeast, and flour set,(its called autolyze method. makes the texture better.. hope you try it.
JA PECIEM RAZNY CHLIEB UZ ROKY TAK PRE SEBA AKO AJ PRE DRUHYCH…..
AK CHCETE MAT MEKY CHLEBA TAK PRIDAJTE UVARENE ( AKO ZEM. PIRE ) ZEMIAKY DO CESTA A TAK VAM AJ DLKSIE VYDRZI…
Jan says that to make the bread softer, you should add some mashed potatoes into the dough. This will also make it last longer.
Thanks for the reminder – my grandma does this too. She basically dumps whatever mashed potatoes she has left over from dinner into the dough. Trash reduction in action…
So I’ve been doing a lot bread baking since posting this original recipe. I tried few different ways of making it, and I think I am finally getting the hang of it. First of all, for rye bread, you don’t want any more than about 1/3 of rye flour (more like 1/4). The rest should be wheat flour, but I’ve had good luck with regular all-purpose flour.
When it comes to making dough, I tried two different ways. I followed Julia Child’s method, in that I made fairly stiff consistent dough, that you knead and knead, even beat on the table. This worked ok, but what works even better is starting with thin dough. Mix the flour with quite enough water so that you make stretchy dough that you just mix and knead with a wooden spoon (varecha). The dough should be consistency of a “blanket” (couldn’t think of a better description), like shown in this picture from the recipe for leavened dough: http://www.slovakcooking.com/wp-content/uploads/2009/12/dough10.jpg.
Then let the dough rise for about an hour or two until it at least doubles in size. Then start working in more flour, mixing and kneading, until you work in enough flour to form a loaf. Bake on the bottom of the oven, so the bread bakes from the bottom up, and has a chance to rise before the crust sets. Good luck!
You can see a loaf I made like this in the recipe for pea soup.
hi lubos
did you tried recipe for croissant from julia child
Cau Jana, not yet. Is it good? I don’t have her cookbook, but I did see the episode where she makes it. I netflixed like all of her videos. She is pretty freaking awesome. My goal is to become the Julia Child of Slovak food and bring Slovak cuisine to America 🙂
I guess that would be “Julian”…
ahoj
skusala som uz najprv s plain four,potom s strong flour nevysli take ako s nasej muky 00 hladka special,chcem tym len povedat ze od urcitej doby nepeciem z inej muly ako nasej mozno ze mam stastie ze mam nedaleko slovakpoint obchod v Corku
takisto si myslim ze aj na chlebik je najlepsia ta nasa muka650
ale klobuk dole ze si sa do toho dal
Dill is another herb that works well with rye bread.
It is possible to make a good rye bread with only rye flour, but the problem is, you can’t make it with the yeast from a shop. You have to make sourdough first and use it instead of yeast. Yeast just doesn’t work on rye flour as it doesn’t contain enough gluten, that’s it. http://en.wikipedia.org/wiki/Sourdough
Thanks “Cuba”, I did not realize that. I’ve been making rye bread regularly but always with a flour blend. I’ll try this sourdough method next time.
Some good instructions to begin with:
http://www.kvaskovychleb.cz/doku.php?id=navody:zalozeni_kvasku
Sometimes you can ask at the supermarket bakery for some yeast and they will just give it to you (rather than the little packets).
This worked for me some time ago
I my household we do not bake a bread just occasionally but regulary, about two per week. We have not been buying a “molitanovy” bread from store for several years now. Although my recepie is simple and nothing special it tastes great. 300ml water, 250gram King Arthur’s bread flour, 100grams spelt flour, 100grams whole wheat flour, 50grams rye flour. Or any combination of spelt, whole wheat and rye as long as they are 250grams combines. You can also skip any one of those three but againg, supplement them with any of the other ones. More rye flour you put in more dense the bread will be. Then add one teaspoon of salt, one tsp sugar, two tsp caraway seeds powder (you can buy it if you are lucky, otherwise grind it on poppy seeds grinder or put the whole one in), 3/4 tsp dried yeasts (I can’t get fresh yeasts where I live)
. One tablespoon of vinegar. Put all in bread maker as the breadmaker manual tells you. many people say bread breadmaker makes sloppy bread and I agreee that that at least the shape is odd an crust is not ideal. But, when you make a bread all the time it saves A LOT of work and time. If you shop for bread machine I would want Zojiroushi brand and the model that is user programmable. I don’t own it but wish I do. It also has better shape of baking pan-horizontal with two blades instead of vertical with one blade.
My original recepie called for milk and teablespoon of oil but over time we found the we like the texture of the bread better just with water and oil only as much as is neccessary for greasing pan.
The higher level of making bread would be with the pure sourdough started but I tried to make one four times I think and it got spoiled. Also, I heard that the gas oven is not ideal for baking bread because burning gas creates moisture and the bread is not as crusty. Electric ovens are lot better wood burning ovens are the best. Or, I’ve seen gas fired bakery ovens but the gas burning area is physically isolated from the bread baking chamber.
Hi Rado! What kind of dry yeast do you use? Rapid Dry? Active or just regular?
Thanks!
I bake quite a bit of both white bread and Rye bread. My favorite is rye. Mom used to bake it in her wood stove oven. It was the best tasting ever. I use my gas oven, and it works really well. I put my rack in the middle of the oven, instead of at the bottom. I did something wrong the last time, and the bread was quite hard.
My mother always raised her rye bread in a voshkata (braided basket) which she got from her parent’s neighbor as a wedding shower gift. He used to make them himself. Mom and Dad were married in 1930. I did not use the voshkata very much, so I passed it on to my nephew’s wife. Since he has two daughters who like to bake, I believe it will stay in the family until it falls apart.